Web Development for Dummies
HTML Tutorial - Part 2 - Web Development for Dummies
by Dev Mehtapublished on
Welcome to another new post of the series - Web Development for Dummies. I hope you have read the last post HTML Tutorial - Part 1 - Web Development for Dummies as this is the continuation of that post. In case, you have not read that post, you can find it out here. In the previous tutorial you learnt about the basic structure of a HTML Webpage and how to add content such as heading, paragraphs, lists, images etc. in it.In this tutorial you will learn about how to create tables and forms in an HTML Page.
Click here to read the previous post.
Tables in HTML
A table is a structured representation of certain data, represented by columns and rows. The data is inserted in cells of the table. A cell is an intersection of a single row and a single column. Vertical lines are called columns and horizontal lines are called rows.
| C1R1 - Column 1 Row 1 | C2R1 - Column 2 Row 1 | C3R1 - Column 3 Row 1 |
| C1R2 - Column 1 Row 2 | C2R2 - Column 2 Row 2 | C3R2 - Column 3 Row 2 |
In the above table, I have named each cell on the basis of their column and row number to help you understand how a table works.
A table in HTML can be created with <table> tag. To add row to a table <tr> tag( tr - stands for table row ) is used and columns are generated automatically based upon the data you provide. Data is inserted with <td> tag( td - stands for table data ). Table headings can be added with <thead> tag. <th> tag is used to define a column heading.
<html lang="en">
<head>
  <title>Tables</title>
  <style>
   body{
   font-family:sans-serif;
   }
  </style>
</head>
<body>
<table cellpadding="3" border="black" align="center">
   <thead>Table</thead>
   <tr>
      <th>No.</th>
      <th>Name</th>
      <th>Price in Rupees</th>
   </tr>
   <tr>
     <td>1.</td>
     <td>Pencil</td>
     <td>5</td>
   </tr>
   <tr>
     <td>2.</td>
     <td>Pen</td>
     <td>10</td>
   </tr>
   <tr>
     <td>3.</td>
     <td>Eraser</td>
     <td>5</td>
   </tr>
   <tr>
     <td>4.</td>
     <td>Ruler</td>
     <td>20</td>
   </tr>
</table>
</body>
</html>
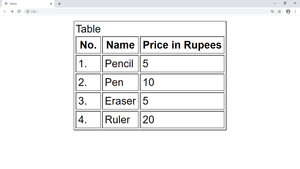
Output of the above code will be:

Forms in HTML
An HTML form is used to collect user input. The user input can then be sent to a server for processing.The HTML <form> element defines a form that is used to collect user input. An HTML form contains form elements. Form elements are different types of input elements, like: text fields, checkboxes, radio buttons, submit buttons, and more.
The <input> Element
The <input> element is the most important form element.The <input> element is displayed in several ways, depending on the type attribute.
Type Description <input type="text"> Defines a single-line text input field <input type="radio"> Defines a radio button (for selecting one of many choices) <input type="submit"> Defines a submit button (for submitting the form)
<input type="text"> defines a single-line input field for text input.
Example:
<form>
  <label for="fname">First name:</label><br>
  <input type="text" id="fname" name="fname"><br>
  <label for="lname">Last name:</label><br>
  <input type="text" id="lname" name="lname">
</form>
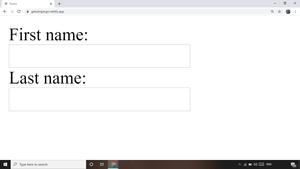
Output:

The <label> Element
The <label> tag defines a label for many form elements. The <label> element is useful for screen-reader users, because the screen-reader will read out loud the label when the user is focused on the input element.The <label> element also help users who have difficulty clicking on very small regions (such as radio buttons or checkboxes) - because when the user clicks the text within the <label> element, it toggles the radio button/checkbox.The for attribute of the <label> tag should be equal to the id attribute of the <input> element to bind them together.
Radio Buttons
<form>
  <input type="radio" id="male" name="gender" value="male">
  <label for="male">Male</label><br>
  <input type="radio" id="female" name="gender" value="female">
  <label for="female">Female</label><br>
  <input type="radio" id="other" name="gender" value="other">
  <label for="other">Other</label>
</form>
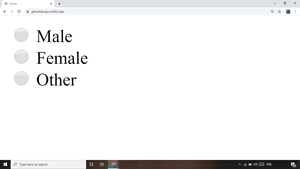
Output

The Submit Button
<input type="submit"> defines a button for submitting the form data to a form-handler. The form-handler is typically a page on the server with a script for processing input data. The form-handler is specified in the form's action attribute.
<form action="{% url 'profile' %}">
  <label for="fname">First name:</label><br>
  <input type="text" id="fname" name="fname" value="John"><br>
  <label for="lname">Last name:</label><br>
  <input type="text" id="lname" name="lname" value="Doe"><br><br>
  <input type="submit" value="Submit">
</form>
The Action Attribute
The action attribute defines the action to be performed when the form is submitted. Usually, the form data is sent to a page on the server when the user clicks on the submit button. In the example above, the form data is sent to a page on the server called "/profile". This page contains a server-side script that handles the form data.
Note: If the action attribute is omitted, the action is set to the current page.
The Target Attribute
The target attribute specifies if the submitted result will open in a new browser tab, a frame, or in the current window. The default value is "_self" which means the form will be submitted in the current window. To make the form result open in a new browser tab, use the value "_blank".
The Method Attribute
The method attribute specifies the HTTP method (GET or POST) to be used when submitting the form data.
When to Use GET?
The default HTTP method when submitting form data is GET. However, when GET is used, the form data will be visible in the page's address field:
/action_page?firstname=John&lastname=Doe
Notes on GET:
- Appends form-data into the URL in name/value pairs
- The length of a URL is limited (2048 characters)
- Never use GET to send sensitive data! (will be visible in the URL)
- Useful for form submissions where a user wants to bookmark the result
- GET is better for non-secure data, like query strings in Google
When to Use POST?
Always use POST if the form data contains sensitive or personal information. The POST method does not display the form data in the page address field.
Notes on POST:
- POST has no size limitations, and can be used to send large amounts of data.
- Form submissions with POST cannot be bookmarked
Here is the list of all <form> attributes:
| Attribute | Description |
|---|---|
| accept-charset | Specifies the charset used in the submitted form (default: the page charset). |
| action | Specifies an address (url) where to submit the form (default: the submitting page). |
| autocomplete | Specifies if the browser should autocomplete the form (default: on). |
| enctype | Specifies the encoding of the submitted data (default: is url-encoded). |
| method | Specifies the HTTP method used when submitting the form (default: GET). |
| name | Specifies a name used to identify the form (for DOM usage: document.forms.name). |
| novalidate | Specifies that the browser should not validate the form. |
| target | Specifies the target of the address in the action attribute (default: _self). |
Conclusion
So thats all about the HTML part of this series. This tutorial won't make you master of HTML but it will surely provide you a crash course of widely used HTML Tags. In the next post we wil discuss about Cascading Style Sheets( CSS ) to style our webpages.
Stay tuned for the next post.Thanks for reading, have a nice day😊.
Comments