Get Started With Django
Django - Installation and Setup Guide - The Right Way to Setup your Django Project
by Dev Mehtapublished on
In this post, I will be covering about installation of django project to your Windows / Unix machine.
By the way, I have started a new instagram account to help more people learn Django. Follow @djangostaan to learn full stack web developement with Python and Django.
Install Python
Django is a Python Web framework. Get the latest version of Python at https://www.python.org/downloads/ or with your operating system’s package manager.
Install Django Framework
Installing an official release with pip
This is the recommended way to install Django.
Install pip. The easiest is to use the standalone pip installer. If your distribution already has
pipinstalled, you might need to update it if it’s outdated. If it’s outdated, you’ll know because installation won’t work.Take a look at virtualenv and virtualenvwrapper. These tools provide isolated Python environments, which are more practical than installing packages systemwide. They also allow installing packages without administrator privileges. The contributing tutorial walks through how to create a virtualenv.
After you’ve created and activated a virtual environment, enter the command:
$ python -m pip install DjangoInstalling the development version
If you’d like to be able to update your Django code occasionally with the latest bug fixes and improvements, follow these instructions:
Make sure that you have Git installed and that you can run its commands from a shell. (Enter
git helpat a shell prompt to test this.)Check out Django’s main development branch like so:
$ git clone https://github.com/django/django.gitThis will create a directory
djangoin your current directory.Make sure that the Python interpreter can load Django’s code. The most convenient way to do this is to use virtualenv, virtualenvwrapper, and pip. The contributing tutorial walks through how to create a virtualenv.
After setting up and activating the virtualenv, run the following command:
$ python -m pip install -e django/This will make Django’s code importable, and will also make the
django-adminutility command available. In other words, you’re all set!
When you want to update your copy of the Django source code, run the command
git pullfrom within thedjangodirectory. When you do this, Git will download any changes.So that's all about installation of django.
Write Hello World With Django
If this is your first time using Django, you’ll have to take care of some initial setup. Namely, you’ll need to auto-generate some code that establishes a Django project – a collection of settings for an instance of Django, including database configuration, Django-specific options and application-specific settings.
From the command line,
cdinto a directory where you’d like to store your code, then run the following command:$ django-admin startproject mysiteThis will create a
mysitedirectory in your current directoryLet’s look at what
startprojectcreated:mysite/ manage.py mysite/ __init__.py settings.py urls.py asgi.py wsgi.py
You won't get asgi.py file, if you use version below than Django 3.0These files are:- The outer
mysite/root directory is a container for your project. Its name doesn’t matter to Django; you can rename it to anything you like. manage.py: A command-line utility that lets you interact with this Django project in various ways. You can read all the details aboutmanage.pyin django-admin and manage.py.- The inner
mysite/directory is the actual Python package for your project. Its name is the Python package name you’ll need to use to import anything inside it (e.g.mysite.urls). mysite/__init__.py: An empty file that tells Python that this directory should be considered a Python package. If you’re a Python beginner, read more about packages in the official Python docs.mysite/settings.py: Settings/configuration for this Django project. Django settings will tell you all about how settings work.mysite/urls.py: The URL declarations for this Django project; a “table of contents” of your Django-powered site. You can read more about URLs in URL dispatcher.mysite/asgi.py: An entry-point for ASGI-compatible web servers to serve your project. See How to deploy with ASGI for more details.mysite/wsgi.py: An entry-point for WSGI-compatible web servers to serve your project. See How to deploy with WSGI for more details.
The development server
Let’s verify your Django project works. Change into the outer
mysitedirectory, if you haven’t already, and run the following commands:$ python manage.py runserver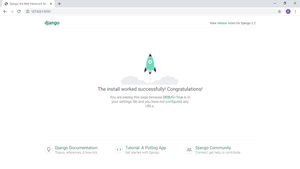
You’ll see the following output on the command line:
Performing system checks...

System check identified no issues (0 silenced).

You have unapplied migrations; your app may not work properly until they are applied.
Run 'python manage.py migrate' to apply them.

May 25, 2020 - 15:50:53
Django version 3.0, using settings 'mysite.settings'
Starting development server at http://127.0.0.1:8000/
Quit the server with CONTROL-C.
Ignore the warning about unapplied database migrations for now; we’ll deal with the database shortly.
You’ve started the Django development server, a lightweight Web server written purely in Python. Now that the server’s running, visit http://127.0.0.1:8000/ with your Web browser. You’ll see a “Congratulations!” page, with a rocket taking off. It worked!
Write Hello World with Django
Now create a file named views.py with following code
from django.http import HttpResponse
"""
The hello_world function takes in request as a parameter and returns HttpResponse "Hello World" to the passed in request.
"""
def hello_world(request):
    return HttpResponse("Hello World")
Now edit your urls.py and add the following line:
"""mysite URL Configuration

The `urlpatterns` list routes URLs to views. For more information please see:
 https://docs.djangoproject.com/en/2.2/topics/http/urls/
Examples:
Function views
 1. Add an import: from my_app import views
 2. Add a URL to urlpatterns: path('', views.home, name='home')
Class-based views
 1. Add an import: from other_app.views import Home
 2. Add a URL to urlpatterns: path('', Home.as_view(), name='home')
Including another URLconf
 1. Import the include() function: from django.urls import include, path
 2. Add a URL to urlpatterns: path('blog/', include('blog.urls'))
"""
from django.contrib import admin
from django.urls import path
from . import views
urlpatterns = [
 path('admin/', admin.site.urls),
 path('', views.hello_world, name='home')
 # The path function takes two positional arguments
 # the route(in this case - ''), and view function
 # The third argument name is option which can later be used
 # for url redirections.
]
Now run your server by typing:
$ python manage.py runserver
You could see Hello World being displayed on the screen. :

Comments